Thursday, February 25, 2016

iPhone Mail Settings

  1. Tap Settings
  2. Tap Mail, Contacts, Calendars
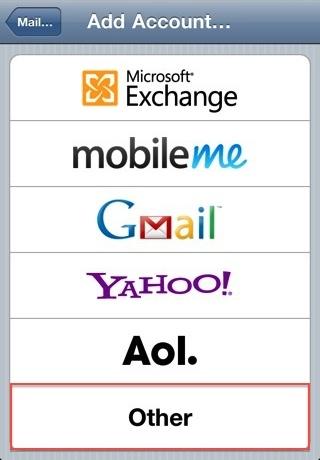
https://tutorials.bluehost.com/help_media/iphone_settings.jpg

  1. Add Mail Account
https://tutorials.bluehost.com/help_media/iphone_add_mail_account.jpg

  1. Choose Other
https://tutorials.bluehost.com/help_media/iphone_other.jpg

New Account Information

https://tutorials.bluehost.com/help_media/iphone_user_info.jpg

  1. Enter your Name
  2. Enter your email address as the Address
  3. Enter the password for your email address
  4. Tap Next
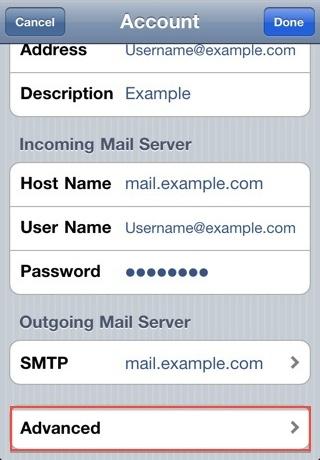
Incoming Mail Server

https://tutorials.bluehost.com/help_media/iphone_incoming.jpg

    • Host Name: This is typically your domain name preceded by "mail.". This can be found in the E-mail Accounts section of the cPanel, under More > Configure Mail Client.
    • User Name: Your email address.
    • Password: The password for your email address.
Outgoing Mail Server

https://tutorials.bluehost.com/help_media/iphone_outgoing.jpg

    • Host Name: This is the same as the incoming server.
    • User Name: This is required and again is your email address.
    • Password: The password for your email address.
    • Tap Next.
Cannot Verify Server Identity

https://tutorials.bluehost.com/help_media/iphone_verify_ssl.jpg

This error message it is due to the SSL certificate being used for the mail server is *.bluehost.com. To use the SSL Certificate simply click Continue.
How to store Sent, Drafts and Trash on the server
To do this please go to Settings > Mail, Contacts, Calendars
      1. Choose your email account
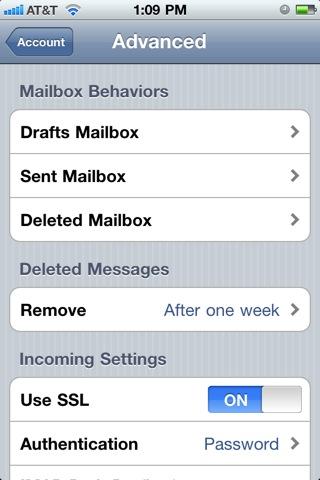
      2. Tap Advanced
https://tutorials.bluehost.com/help_media/iphone_imap_settings.jpg

      1. Under Mailbox Behaviors choose the mailbox you wish to configure.
https://tutorials.bluehost.com/help_media/iphone_imap_advanced.jpg

      1. Choose the corresponding folder on the server you wish to save the email in.
https://tutorials.bluehost.com/help_media/iphone_drafts_server.jpg

      1. Repeat the above steps for any other folders you wish to store on the server.
https://tutorials.bluehost.com/help_media/iphone_imap_folders_server.jpg

Setting Up Your Email in outlook

Configure Outlook 2007
  1. Open Outlook 2007.
  2. Click the Tools menu, and select Account Settings.
Faq 002.jpg
  1. Click on the Email tab and click on the New... button.
Faq 003.jpg
  1. Next select Microsoft Exchange, POP3, IMAP or HTTP and click Next.
Faq 004.jpg
  1. On the Auto Account Setup window, check the Manually configure server settings or additional server types and click Next.
(mt) Media Temple does not support this feature on our mail servers, so you should not use the Auto Account Setup feature.
Faq 006.jpg
  1. Select Internet E-mail option and click Next.
Faq 007.jpg
  1. Fill in the following fields:
    • Enter Your Name as you want it to appear.
    • Enter your full email address XXXX@honeypot.com.sg    in the Email address: field.
    • Select POP3.
    • Enter mail.honeypot.com.sg  in the "Incoming mail (POP3,) server:" field.
    • Enter mail.honeypot.com.sg  in the "Outgoing mail (SMTP) server:" field.
    • Enter your username username@example.com in the "Account name:" field.
    • Enter your email password in the Password: field.
Faq 008.jpg
  1. Perform the following steps:
    • Click on More Settings...
    • Click on the Outgoing Server tab.
    • UN-Check my outgoing server (SMTP) Requires Authentication.
    • Make sure Use same setting as my incoming mail server is also checked.
    • Click on OK.
Faq 009.jpg
  1. Click the Test Account Settings button and you should see all items with green check marks... Click the Close Button to close the test window. Click OK to save your settings.
Faq 008.jpg
  1. Congratulations. You have finished the setup of your email account. Click Finish to close the setup wizard.
Faq.jpgFaq 005.jpg
If you are still having issues sending email, you can try the following:
  1. Click the Tools menu, and select E-mail Accounts.
  2. Highlight the email account and click Change.
  3. Click the Advanced tab, and change the SMTP port to the alternate port of 25 then click on OK.

Office 365 mail account configuration ANDROID


  1. Click on Settings on your phone

    http://www.lse.ac.uk/intranet/LSEServices/IMT/guides/email/images/android365/androidoffice36501.png
  2. Click Accounts | Add Account

    http://www.lse.ac.uk/intranet/LSEServices/IMT/guides/email/images/android365/androidoffice36502.png
  3. The Add Account screen will appear. Click on Microsoft Exchange Activesync~

    http://www.lse.ac.uk/intranet/LSEServices/IMT/guides/email/images/android365/androidoffice36503.png
  4. The Email setup screen will appear. Enter your email account and password then click Manual setup.

  5. Make sure the domain is in the format \your mail ID where your LSE username is your LSE username e.g. warm
    Change the Exchange server to outlook.office365.com
    Click Next

  6. The following screen will appear. Click OK

    http://www.lse.ac.uk/intranet/LSEServices/IMT/guides/email/images/android365/androidoffice36506.png
  7. On the next screen, click OK

  8. The following screen will appear. Click OK

    http://www.lse.ac.uk/intranet/LSEServices/IMT/guides/email/images/android365/androidoffice36508.png
  9. The following screen will appear. Click Activate.

    http://www.lse.ac.uk/intranet/LSEServices/IMT/guides/email/images/android365/androidoffice36509.png
  10. Setup will be complete. Click Done. Your LSE email will be added to your inbox.

Thursday, January 14, 2016

Google Analytics Guide to Implement Analytics Code

Step 1: Open Google Analytics Website -- http://www.google.com/analytics/
Step 2: Login Using Gmail or any Corporate Email id

Step 3: Start Using Google Analytics – To Proceed Sign Up


Step 4: Choose Type of Tracking Website or Mobile App
Step 5: Choose Tracking Method – Account Name, Website Name and URL

Step 6: Click on Get Tracking Id

Step 7: Accept Term & Conditions


Step 8: Copy the Code and Paste under Header Section (For HTML Pages:  Under </head> Section; For PHP Pages: Paste on Master File)

06_Sharepoint 2013 installation

Install software pre-requisites
Click on the SharePoint installer (sharepoint.exe)
Click on the Install software prerequisites link to automatically install all the pre required software.


In the following Microsoft SharePoint 2013 Products Preparation Tool screen, you will be able to see the complete list of the prerequisites products for installation. Click on Next button to continue
On the License Terms for software products screen, read the license terms carefully and check the Checkbox that state the accept the license terms and Click on Next button to continue

In the following screen, the Prerequisite Installer will enable the Application Server Role on your server. And you will be asked to restart the Server. Click on Finish button to continue 


Once, restarted the Server. The Prerequisite Installer will be automatically resumed and continue the installation process
On the “SharePoint Foundation 2013” screen, click on “Install SharePoint Foundation”.


Once the installation is completed you will be launched with the Products Configuration Wizard.
Specify your database name and credentials in the following


Enter the Farm Security Phrase

Wait for the configuration activities to be completed.
Once the Configuration is done you will get the following message. The textboxes shows your appropriate machine parameters.

Following is the screen shot of Central Administration in SharePoint 2013. You can open this from the Start Menu.


Click on the Start the Wizard button as shown above to configure your farm settings. Once the farm configuration is done you should be able to see the following screen.